

Jira is an incredibly popular project management and issue tracking tool and is very flexible and adaptable to project workflows and can be further enhanced with the extensive application ecosystem that surrounds the product. In a recent project, we used Maestro AI to supercharge a Jira workflow to offload external participant feedback loops to Maestro and let Maestro AI determine which feedback loop to use.
The Use Case
The customer’s Jira workflow requires specific external parties to provide feedback, sign off or deployment approval in their projects. For external parties to participate in their Jira projects, they would generally create Jira users for those external parties and have them log into their Jira cloud instance.
For this customer, adding discrete or even generic vendor accounts to Jira is not always desirable as some of their external vendors know nothing about Jira, have zero interest in maintaining an account on our customer’s Jira cloud and would require accounts to be created for each and every project they work on as vendors are not always the same on each project. External parties became yet another facet of a project that the project management team has to manage when they’ve got enough on their plate already! Bottlenecks arise quickly when trying to get external participants to complete tasks.
The Proposed Solution
Jira has an easy to configure “WebHook” mechanism which, when enabled, allows Jira to send external systems information about a project and task when certain criteria is met. The WebHook becomes the input for our Maestro workflow.
What Maestro is really good at is creating tasks with Webforms which humans can fill in and have that information gated and routed appropriately. With Maestro’s AI Task, you’re able to feed Jira and Project information to the AI service of your choice and let the AI Task determine which workflow to spawn. With Maestro’s “Zero-User Notification and Hook” you can deploy a task to external participants and never have them create an account on Drupal or Jira. All the external participants see is a webform and not the complexity of SSO or Atlassian accounts or Drupal accounts.
How it Works
I’ve recreated a very simple and streamlined example with Jira and Maestro to show you what’s possible. This is not a full-blown end-to-end solution. First, Jira. I created an example project called the “Big Business Project” as shown in the Jira board below.
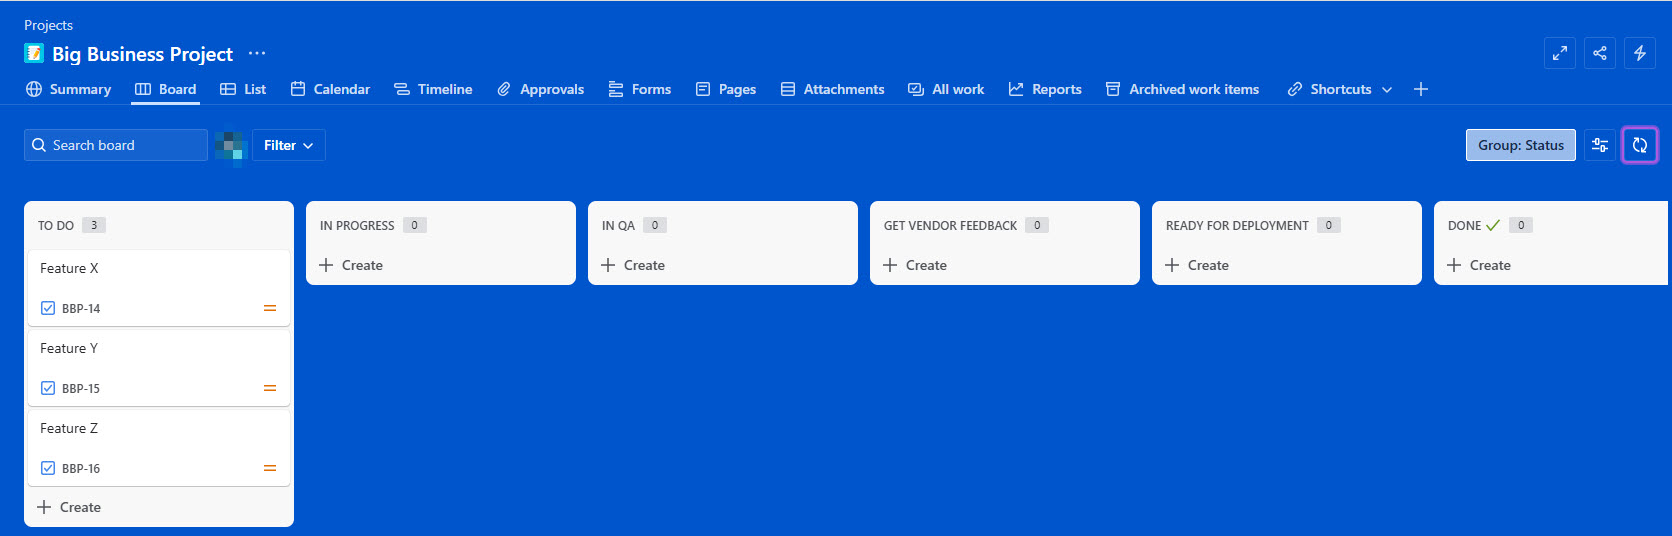
This particular project has 6 available issue statuses.
- To Do
- In Progress
- In QA
- Get Vendor Feedback *
- Ready for Deployment *
- Done
Get Vendor Feedback and Ready for Deployment, for our example, are two statuses which require external input. We have 3 issues created called Feature X, Feature Y and Feature Z. Y and Z are empty issues; just placeholders. However, X is defined as:
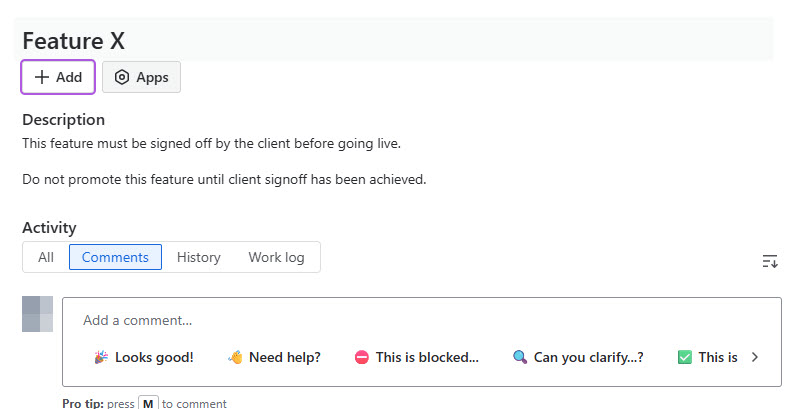
Feature X has some specific information within it that clearly states that the feature should not be promoted until the client has signed off. This becomes important when we hit Maestro and the AI Task. Now on to Jira WebHooks.
Jira WebHooks are available to Jira administrators. Shown below is how I set up my WebHook for this example:
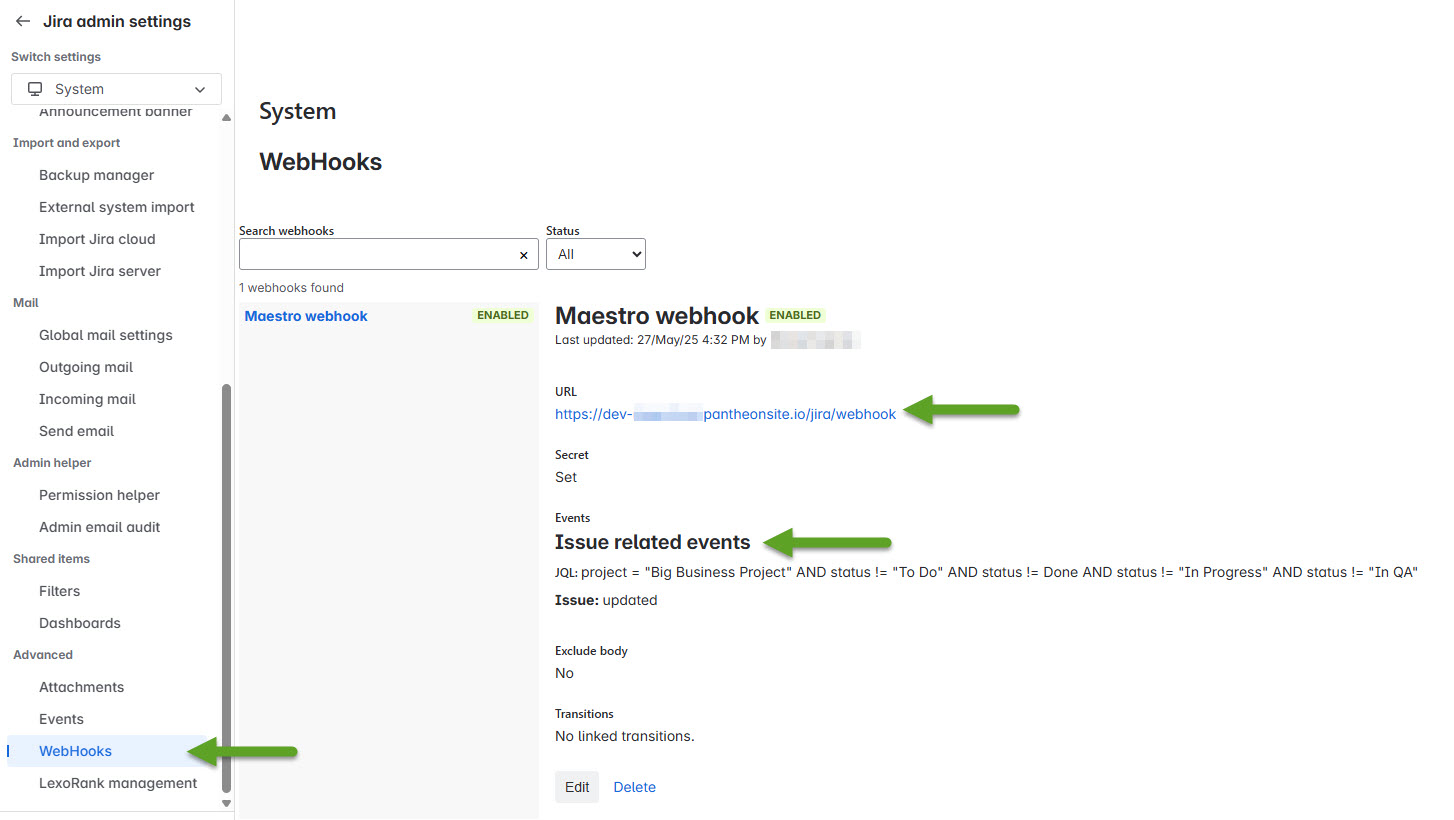
The configuration is as follows:
- Give the WebHook a name. I called this example Maestro webhook.
- Make sure the status is set to Enabled when you’re ready to send data to Maestro.
- Provide a URL that the WebHook information is sent to. In my example, I’m using a Pantheon site! The URL has to be internet accessible, obviously, for the Jira WebHook to be able to resolve and send data to.
- Create a secret that only you and Jira know. This secret is used by your receiving code to validate that the incoming payload is indeed from Jira.
- I created a filter. A very explicit filter that only looks for the Big Business Project and a task that is not in the status of To Do, In Progress or In QA.
- Furthermore, I have only the “updated” flag under the Issue section checked off meaning that I only care when an issue is updated AND is in the Big Business Project AND when the status is anything but To Do, In Progress or In QA.
On to the Maestro configuration. You can use a custom Drupal RestResource or a custom Drupal controller to receive the Jira issue payload. Regardless of which architecture you choose to use, your endpoint must only accept POSTed information to the URL you configured in the Jira webhook. In my example, Jira will post to https://siteurl/jira/webhook. That means if you’re using a RestResource, you will have the uri_paths canonical setting set to /jira/webhook and if you’re using a controller, the route to the controller must be /jira/webhook. Regardless of the mechanism you use, you must return a HTTP 200 OK and a small JSON payload (If your reception of the Jira payload is indeed received properly). It's up to you to determine the best way to secure your Drupal RestResource or Controller from the Internet. You should limit the usage of the endpoint to only Jira.
return new JsonResponse(['status' => 'received']);In the same POST handling mechanism is where
- I validate that the incoming payload is indeed from Jira using the Secret created during the Jira WebHook creation. You probably will also use some other mechanisms to insure that the payload is indeed coming from Jira (IP address ranges, application tokens in the URL etc.)
- Parse the incoming Jira issue data.
- Fire off a Maestro workflow with that issue data.
Here’s how it looks in code:
...determine secret is good...

$data = json_decode($body, TRUE);
if (!isset($data['issue'])) { // If it doesn't contain an issue key
  return new JsonResponse(['error' => 'Invalid payload'], 400);
}
$storage_data = [];
$issue = $data['issue'];
$storage_data['webhook_event'] = $data['issue_event_type_name'] ?? $this->t('Undefined');
$storage_data['initiating_user_display_name'] = $data['user']['displayName'] ?? $this->t('No display');
$storage_data['atlassian_account_id'] = $data['user']['accountId'] ?? $this->t('');
$storage_data['issue_id'] = $issue['id'] ?? $this->t('Missing Issue ID'); // Numeric issue ID
$storage_data['summary'] = $issue['fields']['summary'] ?? $this->t('No summary');
$storage_data['description'] = $issue['fields']['description'] ?? '';
$storage_data['key'] = $issue['key'] ?? $this->t('No key'); // Human readable Issue ID
$storage_data['project'] = $issue['fields']['project']['key'] ?? $this->t('Unknown'); // Short name
$storage_data['project_name'] = $issue['fields']['project']['name'] ?? $this->t('Unknown');
$storage_data['project_rest_api'] = $issue['fields']['project']['self'] ?? ''; // Communicate back to the project via this url
$storage_data['issue_status'] = $issue['fields']['status']['name'] ?? $this->t('No status available');
 // First, start our process
$maestro_engine = new MaestroEngine();
$processID = $maestro_engine->newProcess($template_to_launch); // Jira Main Workflow template
At this point we’ve received and parsed the issue data and created a new Maestro Process with a pre-configured Maestro Template. If we have a valid process started, we then go on to seed our workflow with the Jira data.
if($processID) { // Valid process?  If so, create our entity
  // Now using that data, create the storage entity that is connected to the process.
  $aiStorageEntity = MaestroAIStorage::create([
    'machine_name' => 'maestro_jira_data',
    'task_id' => 'start', // Assigning to the start task as we don't need this element specifically.
    'queue_id' => 0, // We don't need to worry about the queue ID for the purposes of this entity.
    'process_id' => $processID,
    'ai_storage' => json_encode($storage_data),
    'uid' => 0,  // No user context
     'created' => time(),
  ]);
  if ($aiStorageEntity) {
    $aiStorageEntity->save(); // Save it!
  }
  // Create 2 process variables to store Jira information
  $values = [
    'process_id' => $processID,
    'variable_name' => 'jira_status',
    'variable_value' => $storage_data['issue_status'],
  ];
  $new_var = \Drupal::entityTypeManager()->getStorage('maestro_process_variables')->create($values);
        $new_var->save();
  $values = [
    'process_id' => $processID,
    'variable_name' => 'jira_project',
    'variable_value' => $storage_data['project'],
  ];
  $new_var = \Drupal::entityTypeManager()->getStorage('maestro_process_variables')->create($values);
        $new_var->save();
}
We create a Maestro AI Storage entity to store the large(r) amount of JSON data from the Jira payload. We also seed two process variables called “jira_status” and “jira_project” which reflect the status the Jira issue is in and the Jira project the issue is from respectively. We can use the process variables in our workflows, if needed, however we see fit.
Now the Maestro templates. Here are the workflows for my example:
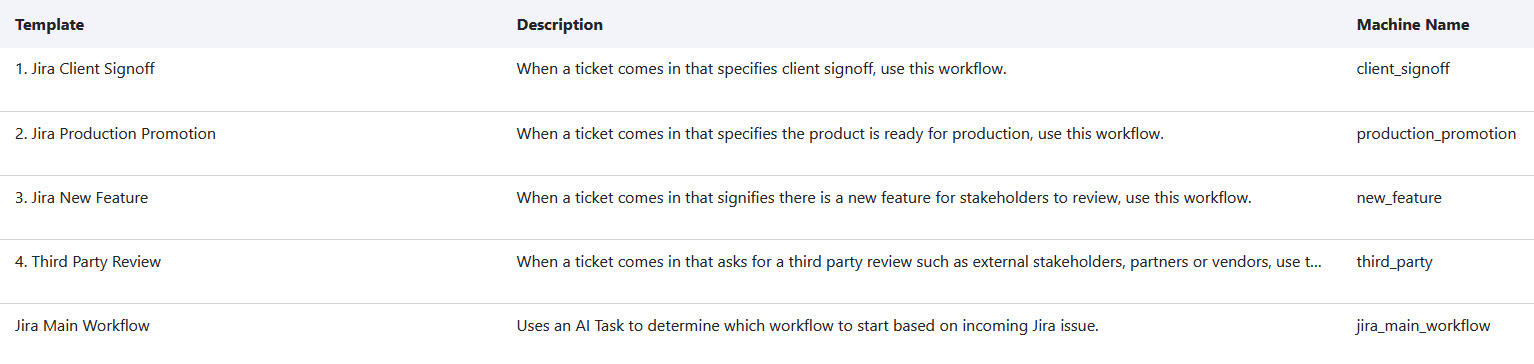
The Jira Main Flow is the entry point we use in the code shown above. In my case, the Maestro Admin user can choose which Maestro template to instantiate from our Jira WebHook endpoint. The other templates numbered 1 through 4 define sub-flows which Maestro AI will determine which to spawn based on the contents of the Jira issue. The Jira Main Workflow looks like this:
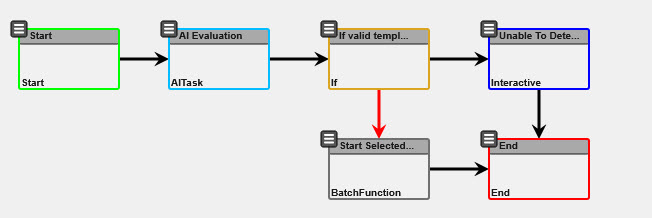
A very simple template that uses the Maestro AI task to evaluate the incoming Jira ticket and determine if there is a Maestro template we need to spawn to handle the Jira issue. If there is a valid template to spawn, we use a Maestro Batch function task to spawn the template.
Let’s look at the AI Task configuration:
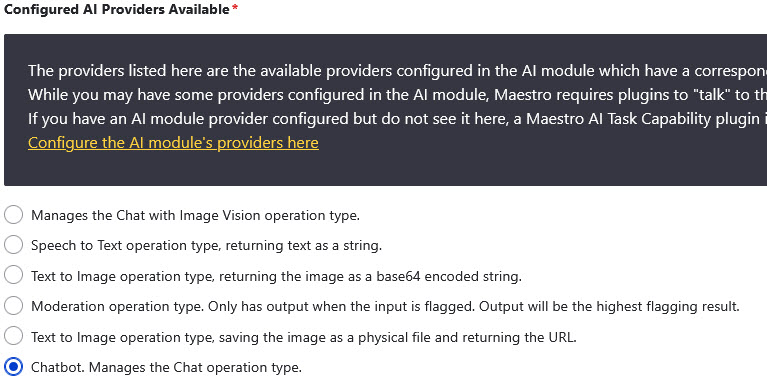
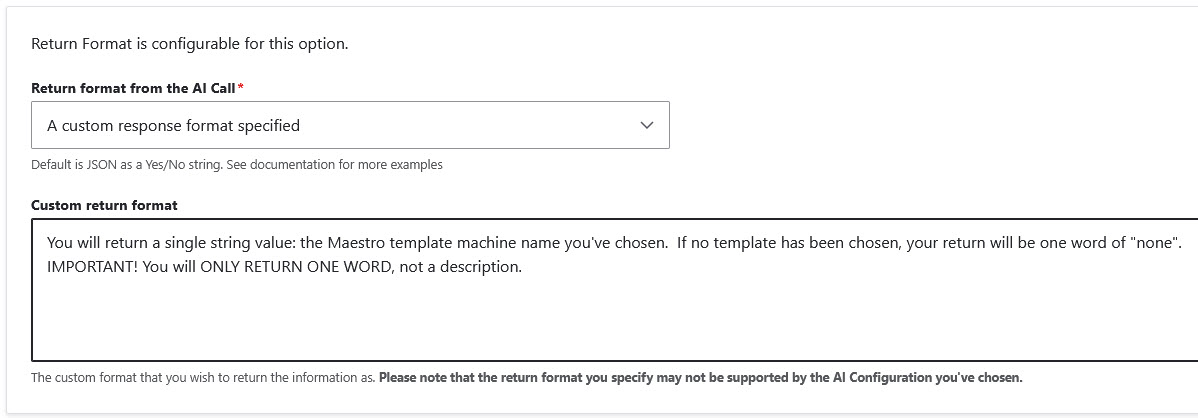

We configure the AI task to read the incoming Jira issue, use the status AND any information within the issue to determine which of the available templates it should choose to instantiate.
We use our Maestro tokens within the prompt to provide a rendered output of the Maestro AI Storage entity, which is our representation of the Jira data.
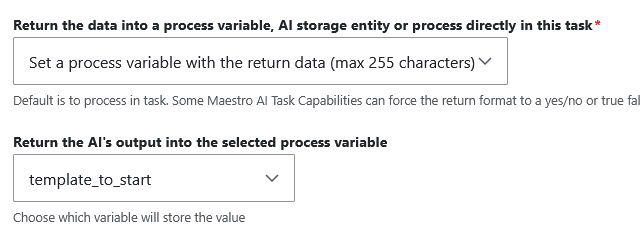
We let AI decide which template to choose out of our list of templates and set the template ID to a process variable called “template_to_start”.
Our Jira Main Workflow Maestro template follows the AI task with an IF to detect if the template_to_start variable is set, and if so, we offload to a batch task which creates a new sub-flow! Now, for a full production version of this, AI can choose to spawn multiple workflows, not just one. You would also have some form of human oversight when spawning sub-flows -- such as having an internal human review that the workflow spawned is indeed accurate and also to have human oversight when no sub-flows are spawned.
You no longer need complex coded solutions or complex logic loops to parse and detect conditions which would alter the flow of your template. You offload all of the decision making to the Maestro AI task and let it make the routing decision for you.
What Happens in the AI Task During Execution?
The AI task is fed the Jira ticket information and the available templates in our system. If we look at the Feature X issue shown in our Jira configuration section of this post, you'll see that Feature X has some information within it that COULD alter the decision for which Maestro template to spawn. Feature X has an issue description of "This feature must be signed off by the client before going live. Do not promote this feature until client signoff has been achieved." That means in Jira, if we set Feature X to "Ready for Deployment", based on the status AND the description information within the issue, AI will most likely decide that the Jira Client Signoff template is the most appropriate workflow to spawn rather than the Jira Production Promotion template. This is due to our AI Task prompt explicitly stating that the description carries more weight than the status in deciding which template to use.
What Happens in the Sub-flows?
The sub-flows are simple templates that create a Maestro Webform Task that is assigned to a role with zero users. The Maestro Zero-User notification mechanism is then used to email the external participants a link to the task for which they complete – without ever having to log into Drupal or Atlassian. The resulting Webform information is fed back into Jira (via Jira webservices) and the task is moved forward in the process!
Need Help?