
In part 1 of our Maestro module overview we explained the different task types that we have available in the module. One of these task types is the Interactive Task and this blog post will provide more detail on this task type and how to create your own custom function for it to use. In an interactive workflow driven process, there are many times you need to present information or request information to a user. Examples of this would include:
- Submit a task to a user to create or update a content type record. This may be a drupal article or something more site specific like a job request setup as a custom content type
- Prompt a user to review a piece of information to approve or reject - possibly an article or that job request
- Ask a user for some information using a form - results of which need to be used in the subsequent workflow
- Ask a user to pick from a list of users who should be assigned a subsequent task in the workflow
- Show a user some information - may not require any action
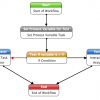
Basically any task where we want to interact with the user and we want full control over what is displayed. We may need to prompt the user with custom submit actions and execute code depending on what action the user takes. For the first example, let's illustrate a simple task where we display a message to the user. Our sample test workflows that come packaged up as a module use this type of interactive task to illustrate the test workflows are executing as expected. The following is a screenshot from the workflow visual editor of one of these workflows which uses a setProcessVariable task to set a variable to a value and then the workflow tests for that value and branches to one of two interactive tasks which display a message to the user that launched the workflow. You may have a need for a task to tell a user to complete some task that is not done on the site or other general message requirement. It does no real work but serves as a good engine test and will let us explore the interactive task further.
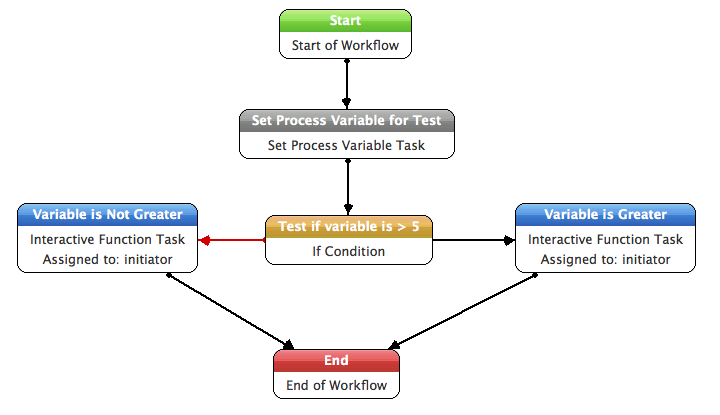
When you edit the Interactive Task, the following dialog panel appears and on the Main tab, you can select the handler to use. The handler is the function that will be called to render the content which is displayed to the user when they click on the task in their task console. You can pick from one of the provided functions or enter the name of your custom function. Developers can easily extend the list of functions that appear in the dropdown but you can select other and enter the function name.
The maestro_show_message function is written to let you define the message right here in the task. The function uses a variable called message and can be set either here in the task under the optional tab or as part of the overall workflow setup. Just need to enter the message to show and then setup the task assignment to the workflow initiator -- that way who ever launches the task will get the interactive task. One the initiator completes this interactive task, the workflow will execute the End task and complete.
When the task appears in the user's task console and they open the task, the message will appear and the user will have a 'complete' button that when clicked will complete the task. The task will stay in the users task console until it's either re-assigned or completed.
So thats how you create the task and setup the task definition for the interactive task, let's now see what the code looks like. The maestro_show_message function is bundled with the maestro_common module in
sites/all/modules/maestro/modules/maestro_common/maestro_common.module.php
We define the return object which is used to return the status of our function, maestro engine command to execute upon return and the HTML to display. All interactive functions will have a display operation to define but can have as many other operations as you require. The display action uses a template to render the HTML and maestro_common_theme() picks up the $message variable as it's passed in automatically in the $parms to the maestro_show_message function. This interactive function will only present the user with a Complete button and there is no data to collect or review/approve actions so we just need the additional complete action which is executed when then user clicks on the COMPLETE button.
function maestro_show_message($op,&$task,$parms) {
  global $base_url;

  $retval = new stdClass();
  $retval->html = '';
  $retval->retcode = FALSE;
  $retval->engineop = '';

  switch ($op) {
    case 'display':
      $retval->html = theme('maestro_common_show_message',array('message' => $parms['message']));
      $retval->retcode = TRUE;
      $retval->engineop = '';
      break;
    case 'complete':
      $retval->retcode = TRUE;
      $retval->engineop = 'completetask';
      break;
  }

  return $retval;

}

function maestro_common_theme() {
  return array(
    'maestro_common_show_message' => array(
      'template' => 'show_message',
      'variables' => array('messsage' => NULL),
    )
  );
}
The template used by the display action is shown below and prints out the $message variable and then we have the form button which is key to how this all works. The input element for the button has a maestro attribute defined and this is how we pass back the custom actions to the interactive function for further processing. We are passing back complete as the maestro action which is where in the maestro_show_message() code, we setup our return object to tell the engine we have successfully completed the task and the engine can flag the task as completed - executing the 'completetask' operation. Otherwise the task will stay in the users task console.
<?php print $message; ?>
So what if we want to have other custom actions and present information to the user that comes from our SAP application and give them an 'UPDATE' button that would execute an action to save data - no problem, just add your additional buttons in the action form like maestro="sapupdate" attribute and write your custom action handler. Have a look at the maestro_reviewContentType interactive function that is bundled in the 'maestro_content_publish' workflow example module. This function will show the user a link to the node to review / edit and prompt them if they Approve or Reject it. They can save their selection and not complete the task and the state of their selection is saved. This is an example of an interactive function that has more then one action defined. The Interactive Task is a very flexible type of task and because you can easily bundle up your workflow definition and custom task related code, we are hoping to see a lot of workflow and example code shared.